Amilia API documentation
The Amilia API allows an organization or partner to fetch data for reporting and integration. It also allows pushing information to Amilia. The API follows RESTful principles and returns JSON.
Versions
We recommend you use version 3 for either organizations or partners, as version 2 is deprecated.
Base URL
Through the documentation data that is meant to be replaced with your own values is surrounded by {curly brackets}. All the endpoints of a given api version share the same root URL (see version page). If using {rewriteUrl} (as is the case in v1 and v2) check in your Amilia account under Account - Options for the value of {rewriteUrl} you must use.
Required Headers
While the Amilia API generally doesn't require you to send specific headers with your request, we do recommend using the X-Amilia-Origin header to let us know who's calling our API for the purpose of identifying potential issues, notifying our partners of deprecations, or helping out with persistant issues. As a parameter, you could send your Amilia partner developer email address or your organization name.
You will find on our use cases page the step-by-step process of how to build an app with our API.
Types of authentication
There are two ways to be authorized with the Amilia API. We offer a bearer JWT-token with a person's identity, or an API key/secret pair for scope based authorization. The JWT token can be retrieved through our authentication API with a user's credentials.
JWT token / user credentials
In order to acquire the JWT-Token you need to use the Amilia authentication endpoint and supply a valid username and password.
The username and password should combined with a single colon (:) and passed in the header in the following format:
Authorization: Basic QWxhZGRpbjpvcGVuIHNlc2FtZQ==The result is a JWT token that expires after 1 year.
For more information on basic auth, see Basic Authentication Wikipedia
In our API, basic authentication is used solely with the call Authenticate the user in the API, in both organizations and partners as well as the corresponding call in v2.
The JWT token can then be used to authorize for the API endpoints by passing it as Authorziation:
Bearer eyJ0eXAiOiJKV1QiLC.eyJ...qsmw (real token is quite long)
Recommendation
- Should use a generic email, not tied to a person in case the employee leaves, the integration account remains valid.
- Should be part of a permission group unique for the integration so it is clear for what kind of access this permission group is for.
- If you want that webuser to have access only via the API, but not the back-office, the permission group should be left empty. Having an empty admin access to an org is sufficient to be granted access to the API data of an org.
With Postman
There are two steps to authenticating with Postman:
- Getting a token using basic auth.
- Making calls using the token or key/secret pair.
1) Getting a token
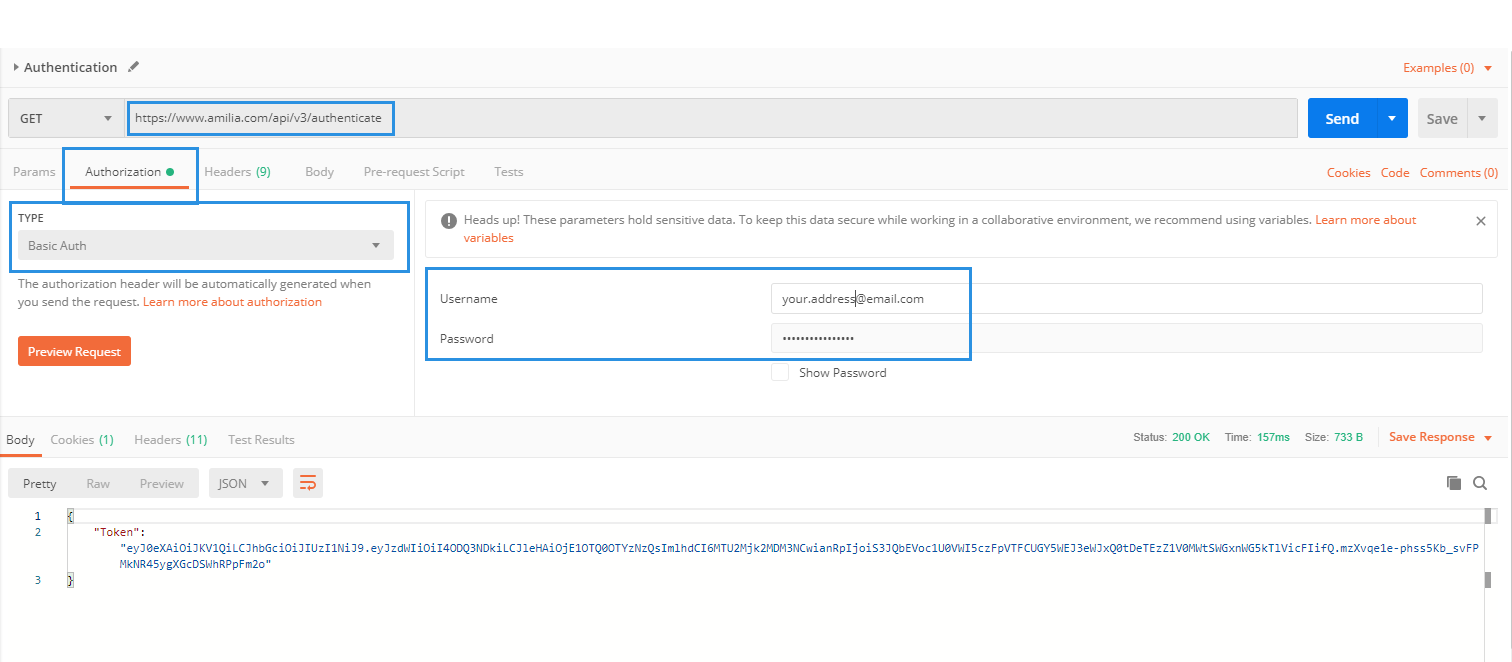
Enter the authorization request url (see Authentication in version page).
In the Authorization tab, choose type 'Basic Auth'
and enter your username (your.address@email.com) and password, as shown in the image below.
Send the request. The response will be a token. You will have to use this token with
all the other calls.

2a) Making a call using the token.
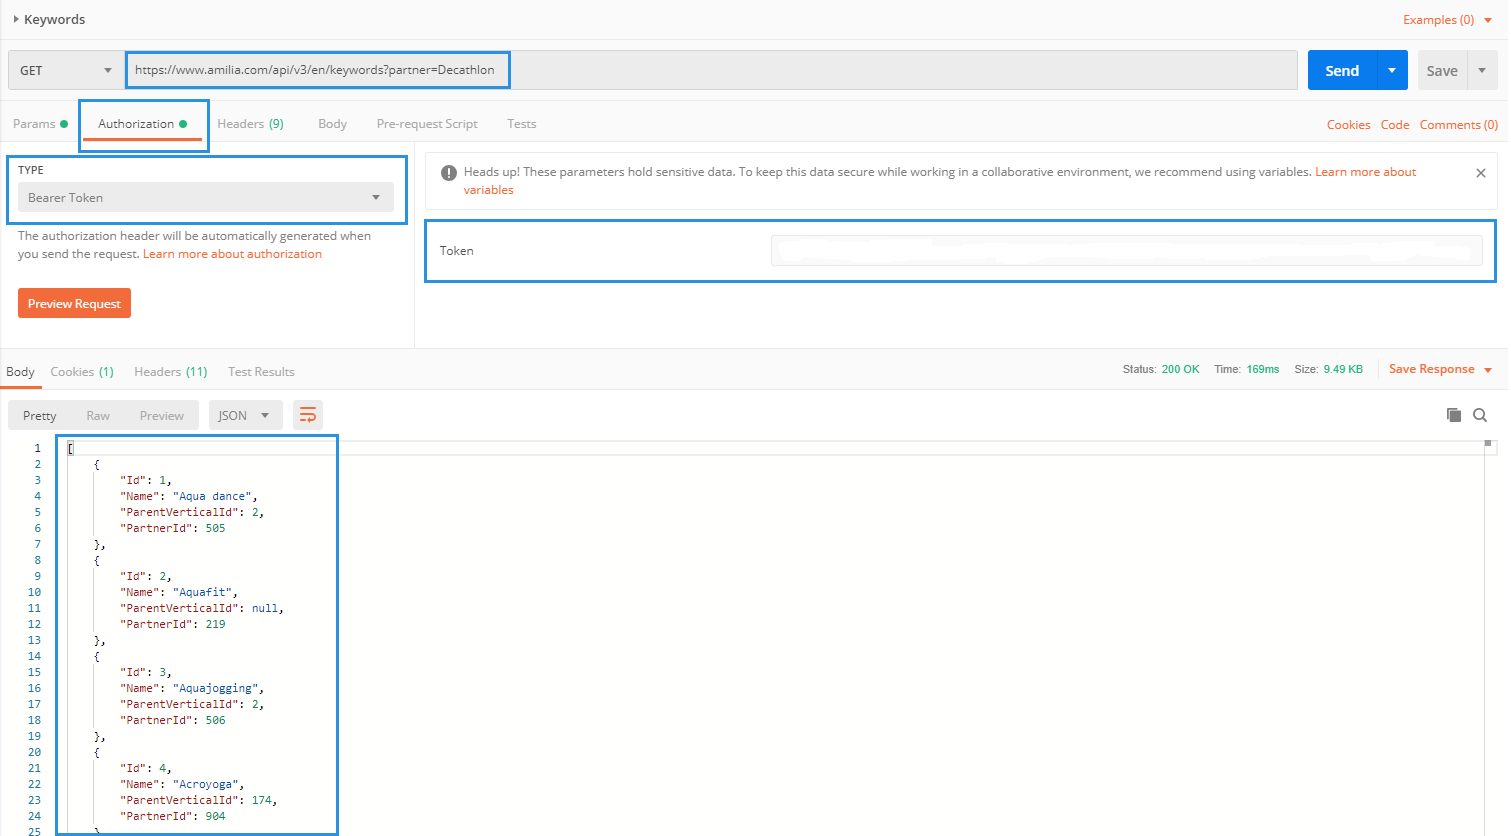
Set Authorization type to 'Bearer Token' in the header and enter
the previously obtained token.
Send the request. You should get a response like the one below, shown for the Get keywords call.

If you set up the token for the entire collection, you can have each future request inherit the authentication method
and save yourself the effort of adding these settings each time.
Similarly, you can set the pre-request script for the entire collection to add the origin header:
pm.request.headers.add({key: 'X-Amilia-Origin', value: '<email-address>' })
Partners and organizations
The main difference between partners and organizations is the amount of information from the API you have access to, which is related to authorization.
Partners
Amilia Partners get access to specific API endpoints (marked [Partner]) in order to provide unique services to organizations accross the board. In order to become an Amilia partner, you can contact Amilia’s Partnership team at partnership@amilia.com.
Organizations
Calls that are accessible to organizations are marked with a [Must be authorized for org] label. For organizations, most endpoints require authentication, and they are marked with a [Must be authenticated] label. To have access to these endpoints you need a valid token or api/key pair.
The labels [Partner] and [Must be authorized for org] are mutually exclusive.
Getting a valid Amilia account (partners and organizations)
For the JWT token authorization you need a valid Amilia account with permissions on the organization you want to access the API of.
The account needs a valid email as username, and the email address must have a mailbox.
In order to avoid problems with staff changes within the organization, we recommend using a dedicated API user account
that is not linked to a specific person, but that is created specifically to access the API,
such as amilia-api@example.com.
| Error code | Error name - Meaning |
|---|---|
| 400 | Bad Request - Parameters or their format are invalid |
| 401 | Unauthorized - Token is invalid |
| 403 | Forbidden - User is not authorized to perform this operation |
| 404 | Not Found - Entity was not found |
| 405 | Method Not Allowed - Given HTTP method is not supported for this endpoint |
| 422 | Unprocessable entity - Validation error |
| 429 | Too Many Requests - Maximum number of calls per second exceeded |
| 500 | Unexpected Internal Error - If you are using the endpoint correctly, contact api@amilia.com for further assistance |
If you contact us for an error, you can provide the TransactionId in the response:

You can only do a certain number of calls per second to our API for one given IP address. Our default value is set to 100 calls per second. Do not worry if your web page makes Ajax calls from the client's browser: this limit will most probably never be met. If you ever do hit this limit, you will receive an HTTP status code 429. You will know that you hit our limit and must wait a little before making your next calls.
Some endpoints use pagination. They are marked with a [Paging] label.
In v3, paginated responses all follow the following form:
        {
            "Items": [],
            "Paging": {
                "TotalCount": NUMBER_OF_RESULTS,
                "Next": url
            }
        }
whereas in v2 and v1 they look like:
        {
          "Items": [],
          "Page": {
            "NextId": int|string,
            "Next": url
            }
        }
Items should contain a list of the requested items.
Page.Next and Paging.Next are the url to
request the next page of data. This field is null if there's no more data to fetch.
You can always use a limit query string parameter to control the page size, allowing some
kind of control over the expected payload response.
To paginate, include the following optional parameters in the url:
| Version | Option name | Default value | Min/max value | Description |
|---|---|---|---|---|
| V3 | perPage | 200 | How many items to return per page | |
| V3 | page | 1 | Minimum page number to return | |
| V2 | limit | 100 | 5-100 | How many items to return per page |
| V2 | idStart | 0 | Minimum item id to return, which corresponds to the one in "nextId" of the previous request |
Amilia also provides webhooks, which can be used to send a payload to an endpoint, once an event happens in Amilia, for example an activity registration, or a facility booking. The payload can be then used to trigger a workflow, either through the receiving app's API, or an intermediary like Zapier.
Contact us at api@amilia.com to discuss how webhooks could be used within your app!